Pref File
Sometimes the default rendering settings for your sprites may not be ideal. Customize them by creating a .pref file.
It can be used to fine-tune sprites, shadows, small NPC avatar icons on the resident board, icons in the adventure ranking, and more.
To create a .pref file, simply create a .txt file and change the filename to id.pref (changing the extension from .txt to .pref, where id represents your character or item sprite ID). Open it with Notepad or any text editor.
TIP
.pref files are hot-loaded. This means you can preview the effect in real time after modifying values, without restarting the game.
Therefore, you can create a .pref file first, and continuously test values by checking the display effect in the game.
File Content
The complete file is as follows, but you may omit any unused fields.
It uses INI format, and values must be integers. ; comments can also be used.
x = 0
y = 0
z = 0
pivotX = 0
pivotY = 0
shadow = 0
shadowX = 0
shadowY = 0
shadowRX = 0
shadowRY = 0
shadowBX = 0
shadowBY = 0
shadowBRX = 0
shadowBRY = 0
height = 0
heightFix = 0
scaleIcon = -40
scaleTex = 100
liquidMod = 0
liquidModMax = 0
hatY = 0
equipX = 0
equipY = 0
stackX = 0For the explanation of each line, please refer to the detailed explanation section below.
Detailed Explanation
x,y,zposition offsetpivotX,pivotYpivot offset, used on small sprites such as resident board avatarshadowShadowData id (see section below)shadowX,shadowYshadow position offsetshadowRX,shadowRYshadow reverseshadowBX,shadowBYshadow backshadowBRX,shadowBRYshadow back reverseheighttile height modifierheightFixtext component height offset (floating little widgets)scaleIconicon size scalingscaleTexpixel density of the texture, as a percentage of the default (see section below);0and100both mean the defaultliquidModtile liquid level modifier; can be negativeliquidModMaxtile liquid level maxhatYhat renderer y position offsetequipX,equipYheld position offsetstackXtile stacking x position offset
High Resolution Sprites
By default a sprite is rendered at 100 pixels per world unit, so a texture with more pixels simply renders bigger rather than sharper. scaleTex tells the game how dense your texture is, letting you ship a higher resolution sprite that occupies exactly the same space in game.
The whole rule is one formula — keep the world size unchanged:
world size = canvas pixels / scaleTex * 100| Original | High resolution | scaleTex | World height | Result |
|---|---|---|---|---|
| 128x256 | 256x512 | 200 | 2.56 | same size, 2x sharper |
| 128x256 | 512x1024 | 400 | 2.56 | same size, 4x sharper |
| 128x128 | 384x384 | 300 | 1.28 | same size, 3x sharper |
Every other value in your .pref — y, heightFix, pivotY, shadowX, equipY and the rest — is expressed in world units. Once the world size is unchanged, they all stay valid and need no readjustment. That is the point of scaleTex: swapping in a sharper texture should not cost you the positioning you already tuned.
WARNING
scaleTex must match a texture you actually scaled up. Setting scaleTex = 200 while keeping the original texture halves the world size, so the sprite becomes smaller and appears to float above the ground — sprites are anchored at their center, so shrinking one lifts its bottom edge.
If your sprite floats after setting scaleTex, it almost always means the texture was not enlarged to match.
TIP
Prefer whole multiples (200, 300, 400). Textures are sampled with nearest neighbour filtering, so a fractional density such as scaleTex = 80 makes some pixel rows one screen pixel wide and others two, producing uneven edges.
Note that tiles and objects are already drawn at 50 pixels per world unit, meaning they are displayed at 2x magnification today. For those, scaleTex = 200 gives a genuine 1:1 pixel mapping on screen — the sharpest possible result with no resampling at all.
Shadow Data ID
| id | name |
|---|---|
| 0 | default |
| 1 | no shadow |
| 17 | pillar |
| 18 | altar |
| 19 | cabinet |
| 20 | bed |
| 21 | counter |
| 22 | gacha |
| 23 | tree |
| 24 | screen |
| 25 | safe |
| 26 | vendor |
| 27 | straw |
| 28 | grave |
| 29 | thin |
| 30 | tree0 |
| 31 | tree1 |
| 32 | tree2 |
| 33 | tree3 |
| 34 | tree4 |
| 35 | tree5 |
| 36 | tree6 |
| 37 | pillar |
| 38 | big table |
| 39 | big table2 |
| 40 | counter2 |
| 41 | door |
| 42 | thin2 |
| 43 | square |
| 44 | boss1 |
| 45 | boss2 |
| 47 | corner |
| 48 | ceil |
| 49 | big |
| 50 | bridge |
| 51 | long |
| 52 | long2 |
Example Mods
Modify Shadow

This mod uses shadow in the .pref file to modify the shadow.
Small Icons

This mod modifies the display of the character's icon on the resident board and the adventure ranking. It uses pivotX and pivotY in the .pref file.
Before modifying the character icon:
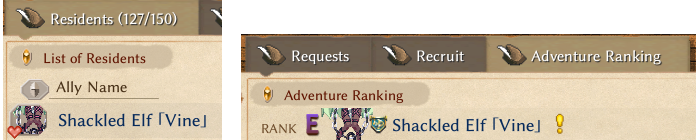
Left is the resident board, right is the adventure ranking
After modifying the character icon using the .pref file:
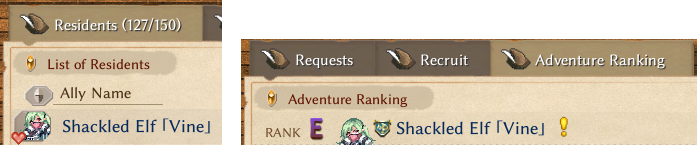
Left is the resident board, right is the adventure ranking
The pref values used for this character in this mod:
pivotX=0
pivotY=-37Note:
- The
.preffilename, the sprite filename, and the id column in the mod’s Excel must all match exactly. pivotXandpivotYaffect both the resident board and the adventure ranking simultaneously; therefore, you should take both into account when testing values.- Due to the hot-loaded nature of
.preffiles, you do not need to restart the game; you can preview the effect in real time, allowing for fine-tuning.